Cloudflare nameservers are assigned inside the Cloudflare zone after you add the domain. Do not guess them or copy values from another domain.
Cloudflare Nameservers for a Name.com Domain
How to find Cloudflare nameservers, replace Name.com default nameservers, handle DNSSEC, wait for propagation, and avoid breaking a Cloudflare Pages site.
Updated: 2026-07-31
For a Name.com domain, remove the old Name.com nameservers, add only the two Cloudflare nameservers assigned to the zone, then click Save Changes.
Changing nameservers does not create search traffic by itself. It gives Cloudflare authority over DNS so Pages custom domains, redirects, SSL, caching, and Search Console setup can be managed in one place.
In the 2026-07-31 Search Console export, this guide had 309 impressions and 0 clicks, so the page now needs a clearer answer to Cloudflare nameserver queries.
Recommended workflow
- Add the domain to Cloudflare first and copy the two assigned Cloudflare nameservers from the zone setup screen.
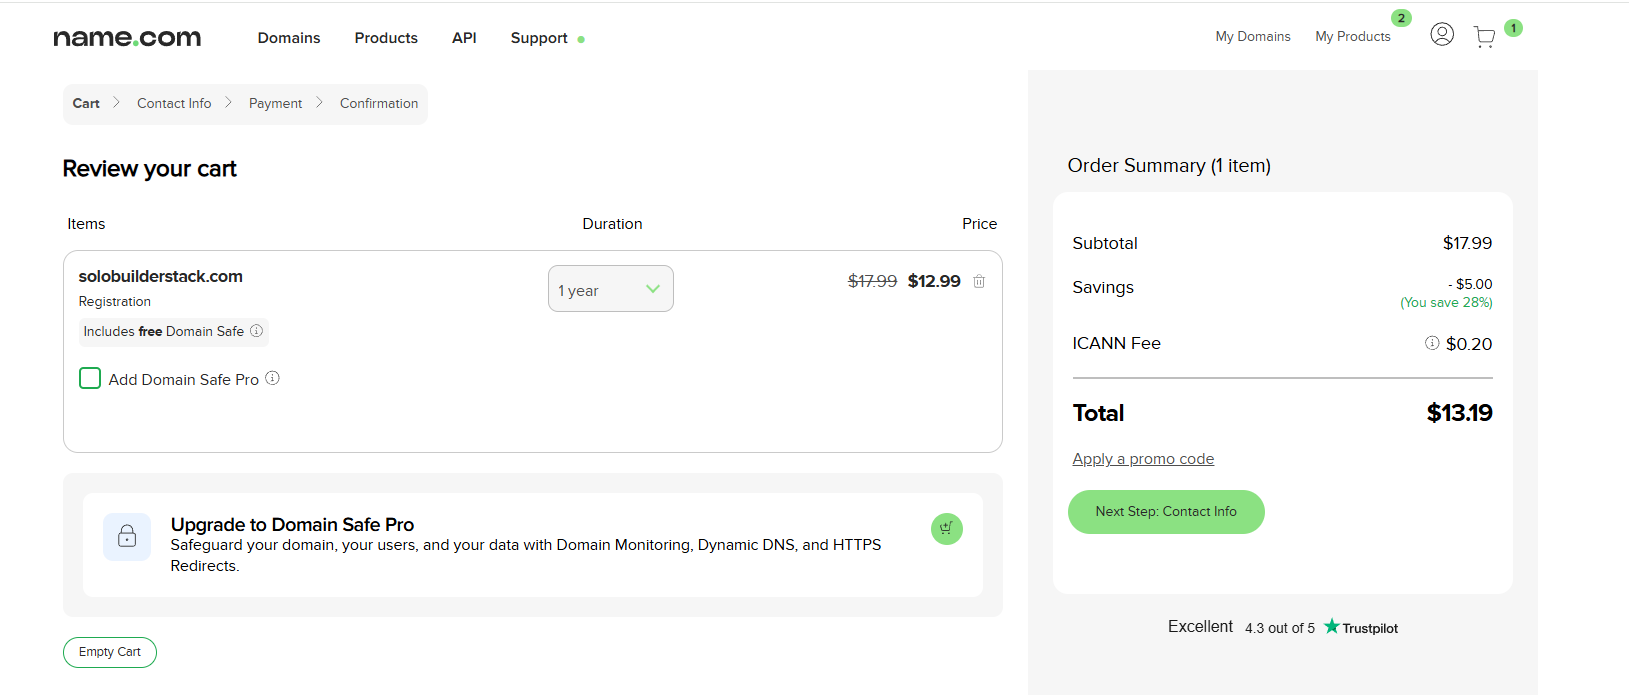
- Buy the domain without unnecessary hosting, email, SSL, or monitoring upsells.
- Open the domain in Name.com and go to Manage Nameservers.
- Delete the old Name.com nameservers and add the Cloudflare nameservers exactly as shown.
- Save changes in Name.com and return to Cloudflare to trigger the nameserver check.
- Wait for activation before attaching Cloudflare Pages custom domains or submitting Search Console data.
- Keep DNSSEC off during the handoff unless you already know how to re-enable it with the new DNS provider.
1. Quick answer: where Cloudflare nameservers come from
Cloudflare assigns two authoritative nameservers after the domain is added to a Cloudflare zone. Those two values are unique to the zone setup and should be copied from Cloudflare's onboarding or zone Overview screen.
At Name.com, the job is not to create DNS records. The job is to replace the registrar's current nameservers with the two Cloudflare nameservers, save the change, and then wait for Cloudflare to detect that the delegation has propagated.
- Get the two nameservers from Cloudflare, not from a blog post.
- Delete the old Name.com nameservers before saving.
- Add one Cloudflare nameserver per field.
- Keep at least two nameservers on the domain.
- Wait for propagation before diagnosing Cloudflare Pages or Search Console issues.
2. Why this step matters
Name.com is the registrar in this workflow. Cloudflare becomes the authoritative DNS provider after the nameservers are changed. That distinction is important: the domain is still registered at Name.com, but DNS records are controlled in Cloudflare.
Cloudflare's DNS documentation says nameservers need to point to the nameservers assigned in the Cloudflare account for Cloudflare DNS to become authoritative. In practical terms, this is what lets the Cloudflare dashboard manage records, proxy status, custom-domain activation, SSL, redirects, and later Search Console verification more cleanly.
This step is not a ranking trick. It is infrastructure cleanup. A clean DNS setup reduces the chance that the site has duplicate hosts, broken SSL, stale registrar parking records, or a sitemap on the wrong domain.
- Registrar: Name.com keeps domain registration and renewal.
- DNS provider: Cloudflare answers DNS after nameservers are changed.
- Hosting: Cloudflare Pages serves the static site after the custom domain is attached.
3. Start in Cloudflare, not Name.com
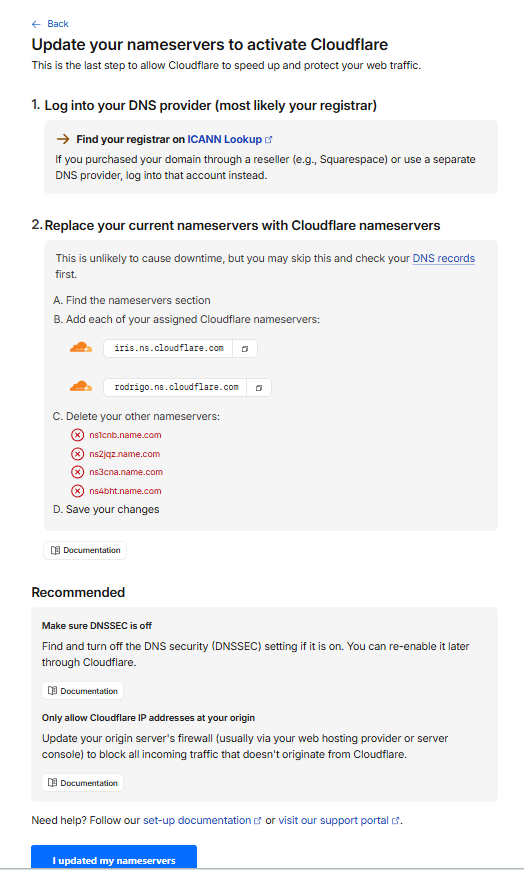
Do not guess the nameserver values. Add the domain to Cloudflare first and let Cloudflare assign the two nameservers for that zone. Cloudflare's full setup flow starts by adding the domain, reviewing DNS records, then changing nameservers at the registrar.
In our setup, Cloudflare showed a clear instruction screen with two assigned nameservers and a list of the old Name.com nameservers to remove. That screen is the source of truth for the values to enter at Name.com.
- Add the domain to Cloudflare.
- Review imported A, CNAME, and other DNS records before activation.
- Copy the assigned Cloudflare nameservers exactly.
- Keep the Cloudflare tab open while editing Name.com.
4. Replace nameservers inside Name.com
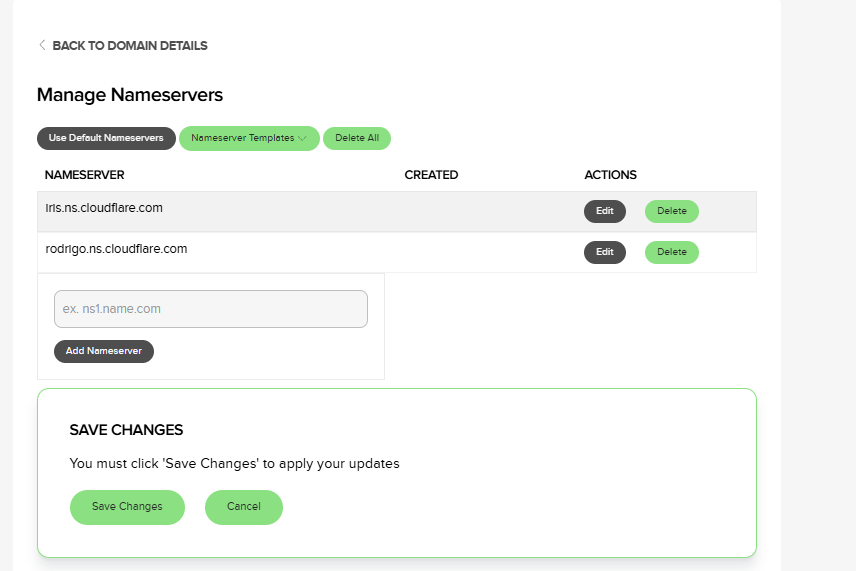
Name.com's support article for changing nameservers says to open My Domains, choose the domain, use Manage Nameservers, clear the current nameservers, add the new nameservers, and save the changes. The exact interface can change, but the concept is stable: remove the registrar defaults and add only the Cloudflare nameservers assigned to the zone.
In the solobuilderstack.com setup, the Name.com Manage Nameservers screen showed two Cloudflare nameservers added and a Save Changes panel. That final save matters. Leaving the page without saving means Cloudflare will continue waiting.
- Open Name.com > My Domains.
- Select the domain.
- Open Manage Nameservers.
- Delete the existing Name.com nameservers.
- Add the two Cloudflare nameservers.
- Click Save Changes.
5. Handle DNSSEC carefully
Cloudflare's nameserver setup documentation includes a DNSSEC check before updating the registrar. If DNSSEC is enabled at the old provider with old DS records, changing nameservers can cause resolution problems until the DNSSEC configuration matches the new provider.
Name.com has a DNSSEC management page under the domain's nameserver area, and its DNSSEC FAQ says Name.com can work with third-party DNS providers that support DNSSEC. For a beginner site, the safer first move is to keep DNSSEC off during the handoff, confirm the domain is active in Cloudflare, and only revisit DNSSEC after the site, custom domain, SSL, sitemap, and redirects are stable.
- If DNSSEC is on, understand it before changing nameservers.
- Do not copy random DS records from old setup notes.
- Re-enable DNSSEC later only with Cloudflare's current DNSSEC values and registrar-side setup.
6. Wait for Cloudflare activation before doing the next step
After saving nameservers at Name.com, Cloudflare may show a waiting state while it checks whether the registrar has propagated the new nameserver delegation. In this project, we clicked the Cloudflare check after saving and then waited until Cloudflare recognized the update.
This waiting period is normal. Repeatedly changing DNS records, adding duplicate zones, or submitting Search Console too early can create more confusion than progress. The practical milestone is simple: Cloudflare should show the domain as active before the Pages custom-domain work is treated as complete.
- Use Cloudflare's Check nameservers action after saving at Name.com.
- Wait for Cloudflare to show the domain is active.
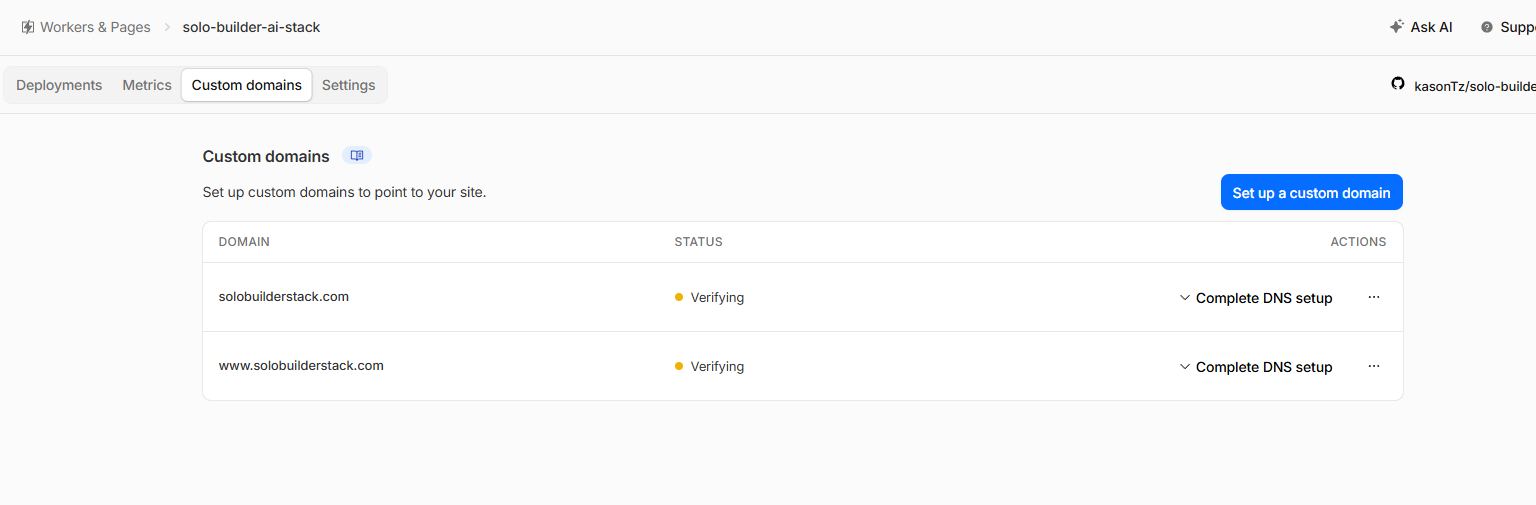
- Then attach the apex and www hostnames to the Cloudflare Pages project.
- Only submit the sitemap after the final HTTPS domain and redirects work.
7. What this changes for Search Console and monetization
Changing nameservers is not a traffic source. It supports the foundation that later makes Search Console and monetization easier to manage. Once Cloudflare is authoritative, the same platform can manage DNS records, redirects, SSL, custom domains, sitemap availability, and Cloudflare-assisted Search Console verification.
For a new site, this is useful because early Search Console data is already sparse. The last thing the site needs is split signals between Name.com parking records, pages.dev, www, and apex hosts. A single DNS control plane helps keep the canonical site clean.
AdSense, affiliate links, and sponsorships should still wait. A working domain is only the infrastructure layer. The revenue layer depends on original useful pages, policy-safe navigation, Search Console demand, and trust.
- DNS handoff helps infrastructure quality.
- It does not create indexing, ranking, traffic, AI citations, or ad approval by itself.
- Use it as a prerequisite for clean publishing, not as a monetization shortcut.
8. What the current Search Console data suggests
The 2026-07-31 Search Console export showed this page with 309 impressions and 0 clicks. That is the clearest mismatch on the site: Google is testing the page for Cloudflare nameserver queries, but searchers are not clicking yet.
The fix is not to add ads or affiliate links. The fix is to make the page answer the query faster. A beginner searching cloudflare nameservers probably wants to know where the nameservers are, whether they should replace registrar nameservers, how long propagation takes, and what can break if DNSSEC or old nameservers are left in place.
- Keep the title focused on Cloudflare nameservers and Name.com.
- Answer the quick setup question in the first screen.
- Keep the DNSSEC warning visible.
- Link to sitemap and Search Console troubleshooting because those are the next problems after DNS handoff.
Common mistakes to avoid
Do not enter Cloudflare nameservers before adding the domain to Cloudflare and seeing the assigned values.
Do not leave old Name.com nameservers mixed with the Cloudflare nameservers.
Do not forget to click Save Changes in Name.com.
Do not submit Search Console or sitemap data while the domain is still using registrar parking records.
Do not publish screenshots that show account emails, phone numbers, billing addresses, order IDs, API IDs, or verification tokens.
Primary sources
- Name.com changing nameservers for DNS management
- Name.com managing DNSSEC
- Name.com DNSSEC FAQ
- Cloudflare change your nameservers full setup
- Cloudflare update nameservers
- Cloudflare DNSSEC
- Cloudflare Pages custom domains
Related setup guides
Fix Search Console Couldn't Fetch for a Cloudflare Pages Sitemap
A field-tested checklist for fixing Google Search Console Couldn't fetch on a Cloudflare Pages sitemap, with live URL, redirect, cache, and custom-domain checks.
Connect Cloudflare Pages to Google Search Console
A field-tested workflow for connecting a Cloudflare Pages site to Google Search Console, submitting a sitemap, checking URL Inspection, and reading the first performance signals.
Launch an AI Tool Directory with Cloudflare Pages, Name.com, and Search Console
A field-tested setup log for buying a domain, deploying a static AI tool directory, adding canonical redirects, and submitting a sitemap to Google Search Console.
Why a New AI Tool Directory Has Impressions but No Clicks
A practical diagnosis for a new AI tool directory that appears in Google Search Console but still has zero clicks.
Tools to inspect first
Cloudflare Pages
Deploy static builds, preview branches, and edge functions.
Google Search Console
Submit sitemaps, inspect indexing, monitor queries, and track search clicks.
Astro
Build fast static pages from content collections and deploy to a CDN.
Next.js
Build SEO pages, app routes, API endpoints, and richer web products.